You are using an out of date browser. It may not display this or other websites correctly.
You should upgrade or use an alternative browser.
You should upgrade or use an alternative browser.
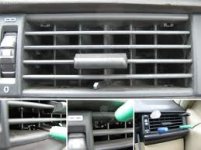
ถอดช่องแอร์กลาง
- Thread starter rwit
- Start date
รบกวนท่านผู้รู้ช่วยสอนวิธีถอดช่องแอร์ตรงกลางของ w124 ด้วยครับ
ขอบคุณล่วงหน้าครับ
เปิดเก๊ะออกมีน็อต4แฉกอยู่ด้านข้าง แล้ามีหกเหลี่ยมเบอร์4 ตรงกลาง ขันออกใด้เลย
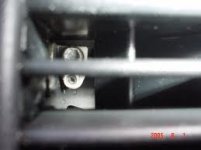
ตามนี้ครับ
http://www.mbca.org/forum/1995-w124-e320-sedan-center-vent-light-replacement
LEFT & RIGHT VENTS: There are four spring clips that secure the vent to the dash. They are located inside the vent louver assembly. Using a flashlight, look inside the vent at the lower and upper surfaces - you'll see spring clips with a small hole just protruding above the surface of the vent - 2 on the bottom and 2 on the top. The trick is to use a small pointed tool inserted into the hole in the clip. Lift the clip upward (or downward for the upper ones) while applying an outward pulling force on the assembly - I use needle nose pliers padded with a cloth on the jaws so as not to mar the vent vanes. Don't pry against the dash - it's soft and can be torn or dented. Just maintain an outward pull on the assembly while you lift each spring clip in turn - the vent assembly will ease on out.
CENTER OUTLET: In this case, first release the operating lever inside the vent using a metric Allen wrench (about 2 or 3 mm) to unscrew the flap link from the wheel. Shine a light inside the vent along the right side of the wheel - the Allen screw is visible inside - unscrew (turn counter-clockwise) the screw to release the link. On the right side, there is a Phillips-head screw accessible when the glove box door is open. As above, look inside for spring clips to retract that will allow the assembly to move outward. Use same size bulb as above. When re-assembling, after the unit is seated, re-attach the wheel link to the flap lever by engaging the Allen screw and rotating it clockwise. Tighten the screw only enough so that the wheel closes the vent with slight resistance. (If you over tighten it, you get to buy a new assembly...)
ระวัง!!!! ข้อความในวงเล็บสุดท้าย เวลาประกอบกลับ...ไขเข้าไป***ไม่เกิน 2 รอบ*** ถ้าเกิน จะเสียหาย!!!!:curse:
รูป คลิ้ปสปริงในช่องแอร์ข้างขวา และสกรู 6 เหลี่ยม(Allen screw)ช่องกลาง ครับ